


Ship to:
United States
Select the desired shipping method
- Shipping Company Estimated Delivery Time Shipping Cost


Highlights
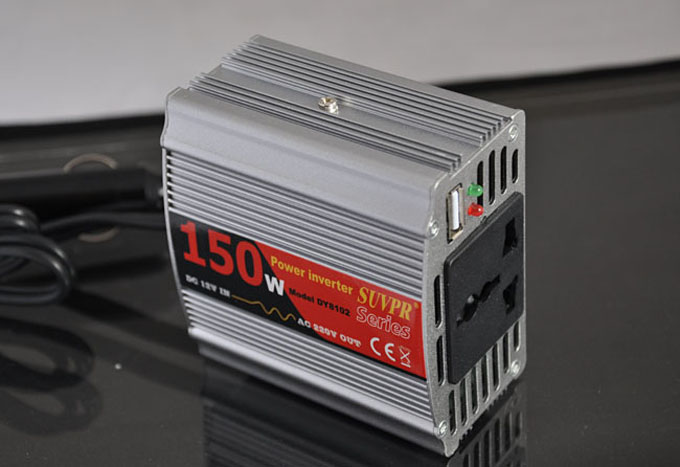
- The car power inverter can convert DC 24V into AC 220V output. And it can be widely used in all kinds of electrical apparatus, which voltage rating are AC 220V and frequedcy are equal to 50Hz., such as mobile telephone, portable computer, electric light, digital camera, vidicon, TV, electric tool, CD player, DVD, fanner and so on. It is the best choice for your field survey, driving out outdoor office, or meeting an urgent need when power failure.
Specifications
|
Shell material
|
Al-Mg alloy
|
|
Input voltage
|
DC 24V
|
|
Output voltage
|
AC 220V
|
|
Power rating
|
150W
|
|
Power for long use
|
120W
|
|
Output frequency
|
50±2Hz
|
|
USB
|
DC 5V
|
|
Over load protection
|
YES
|
|
Short circuit protection
|
YES
|
|
Low voltage protection
|
9.5V~10.5V/19V~21V
|
|
Over voltage protection
|
14.5V~15.5V/29V~31V
|
|
Ambient temperature
|
-5~50 centi grade
|
|
Weight
|
300g
|
|
Size
|
82*89*47mm
|
How to Install a Car Power Inverter?
- Park the vehicle and open the hood. Disconnect the battery by loosening the positive cable with a wrench and pulling it free with your hand
- Mount the power inverter. Pick a location which will allow plenty of air flow around the inverter as they heat up when used. A typical mounting location is on the lower kick panel in the passenger side of the vehicle under the dash. Apply the adhesive side of the hook and loop material to the under side of the inverter and peel the protective strip off of the reverse side. Stick the inverter in the desired mounting location and press firmly to set adhesive in place. Separate the inverter from the kick panel to wire the connections
- Wire the inverter. Run a length of wire (0 to 4 gauges) from the positive side of the inverter to the car's battery by running the wire through a grommet in the firewall. Simply find a location where wires pass through the fire wall and push your new positive wire through the center of the existing wires. Locate the new wire on the engine side of the firewall and pull it through until it reaches the positive side of the battery. Cut the wire with wire cutters. Tie the wire out of the way by zip tying it to the existing wiring. Strip 1/4 inch of plastic shielding from each end of the wire. Place a terminal end on each end of the wire and crimp in place with a crimping tool. Do not connect this wire to the battery at this time. To connect the ground, run a short length of wire from the inverter's negative wire to the vehicle's chassis (any bolt under the dash will work fine)
- Connect the wires. Connect the new positive and negative wires to the wires coming from the inverter to the wires you installed into the vehicle by placing terminal ends on the wires and crimping them in place in the same manner as the positive wire at the battery. Loosen the bolt you identified under the dash with a wrench and place your ground wire on the bolt. Tighten the bolt. Place the inverter on the kick panel by pushing the hook and loop material together. Connect the positive wire to the battery's positive terminal post and reconnect the cars positive cable back onto the battery. Tighten the terminal in place with a wrench
- Use the inverter. You are now able to operate 120 volt electronics from your vehicle by simply plugging them into the outlets on the inverter while your engine is running
Details:
What's in the box?
- 1 x 150W DC 24V to AC 220V USB Car Power Inverter Adapter
Customer Photos
Customer Videos
Customer Reviews
| 5 star | 0 | |
| 4 star | 0 | |
| 3 star | 0 | |
| 2 star | 0 | |
| 1 star | 0 |
Write A Review
- All (0)
- Images (0)
- Videos (0)